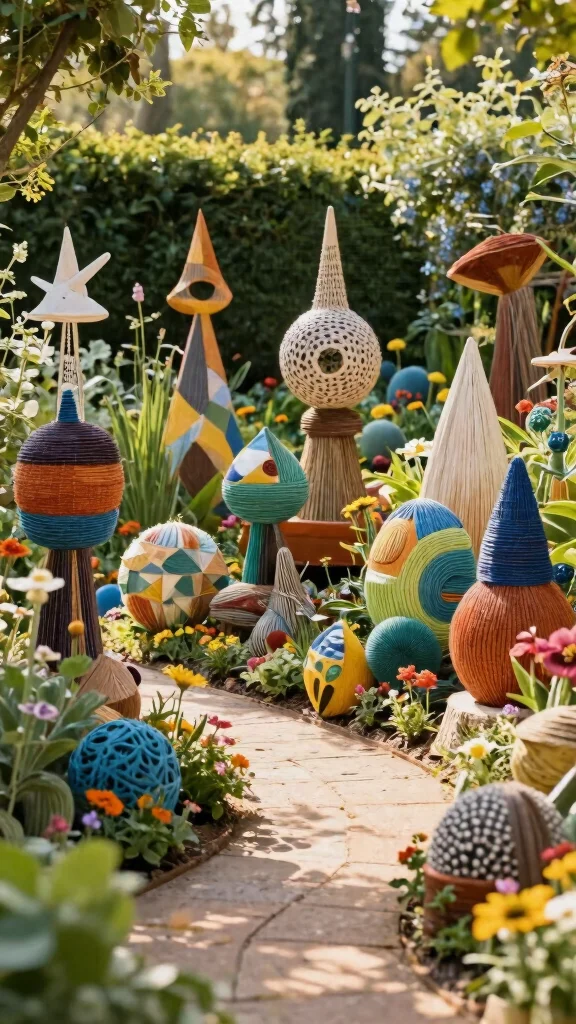
Creating a captivating garden space can sometimes feel overwhelming. You may find yourself scrolling through social media, wishing for that unique garden art that will truly make your outdoor space pop. Let’s face it, the same old flower beds and plain planters just don’t cut it anymore. That’s why I put together this list of 20 Decorative DIY Garden Sculptures That Will Wow Your Neighbors!. These ideas not only add charm and personality to your garden, but they also give you a fun and creative outlet to express your style.
If you have a passion for gardening or simply want to enhance your yard, this post is perfect for you. Whether you’re a seasoned gardener or a weekend warrior, you’ll find something here that speaks to you. From whimsical fairy houses to rustic birdhouses, there are plenty of options to explore. You’ll discover how easy it is to transform ordinary materials into stunning garden art that will leave your neighbors impressed and inspired.
By diving into this article, you will receive practical tips and step-by-step guidance on crafting each project. You’ll learn how to use recycled materials, discover new techniques, and ignite your creativity. Get ready to embark on a journey filled with fun DIY projects that can take your garden from drab to dazzling in no time!
Key Takeaways
– Discover 20 unique DIY garden sculptures that can add personality and charm to your outdoor space.
– Transform ordinary materials into stunning garden art that showcases your creativity and style.
– Explore various techniques and ideas, such as whimsical fairy houses and recycled garden art.
– Learn how to create projects that fit your budget and enhance your garden’s appearance.
– Get inspired to make your garden a reflection of you, impressing both yourself and your neighbors with unique designs.
1. Whimsical Fairy Houses
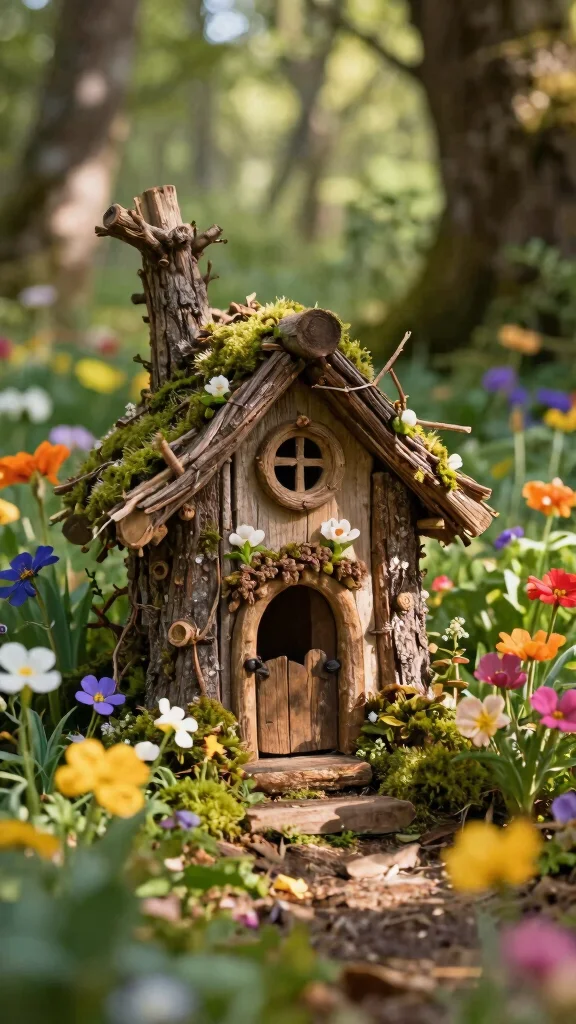
Imagine a garden filled with magical fairy houses that spark your imagination. These enchanting little homes can be made from natural materials like hollow logs or upcycled clay pots, adding charm to your outdoor space. Decorate them with moss, pebbles, or tiny furniture to create inviting spots for fairies to call home.
To kick off your fairy house project, select a sturdy base like a hollow log. Use a hot glue gun to attach twigs, leaves, and other natural elements to the outside. For an extra pop of color, consider painting your creation in vibrant hues. Place your fairy house among blooming flowers to enhance its whimsical appeal. Remember to waterproof it and check for repairs regularly to ensure it remains magical.
Key materials to gather:
– Hollow log or clay pot
– Sticks and leaves
– Paint (optional)
– Miniature furniture (optional)
Steps to create your fairy house:
1. Pick a base for your house.
2. Gather natural materials for decoration.
3. Attach elements using hot glue creatively.
4. Paint your house if you’d like.
5. Place it amidst flowers for added magic.
This delightful project will bring joy to you and your neighbors, creating a whimsical touch in your garden that everyone will love!
📹 Related Video: I carve a Fairy house from Cottonwood bark
2. Recycled Garden Art
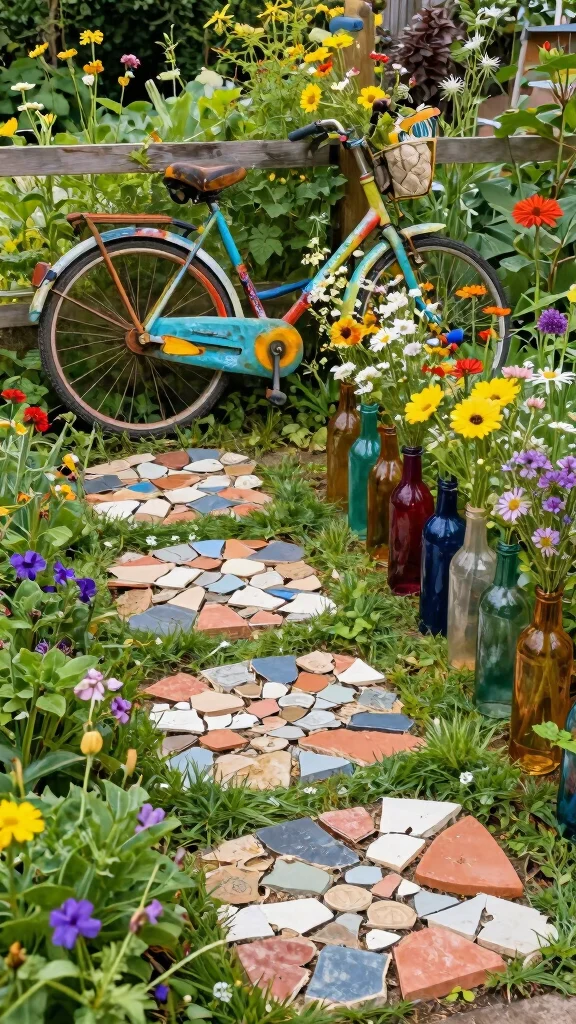
Unleash your creativity by turning everyday discarded items into stunning garden art. Recycled sculptures not only enhance your garden’s beauty but also promote an eco-friendly approach to decor. Think creatively; old bicycle wheels, shattered pottery, or glass bottles can be reimagined into unique masterpieces.
Begin by collecting materials that inspire you. An old bike wheel can become a vibrant wall decoration, while broken pottery can be arranged into a colorful mosaic. Use strong adhesive to secure glass bottles into whimsical flower holders, adding a personal touch to your garden. This project allows for endless creativity while helping the environment.
Essential materials to gather:
– Old bicycle wheels
– Broken pottery
– Glass bottles
– Paint and adhesive
Steps to create your recycled art:
1. Collect various discarded items for your project.
2. Clean and prepare materials for use.
3. Assemble and paint as desired.
4. Secure items in place with strong adhesive.
5. Display in your garden for visual interest.
By infusing your garden with recycled art, you’ll create a vibrant atmosphere that showcases your personality and creativity!
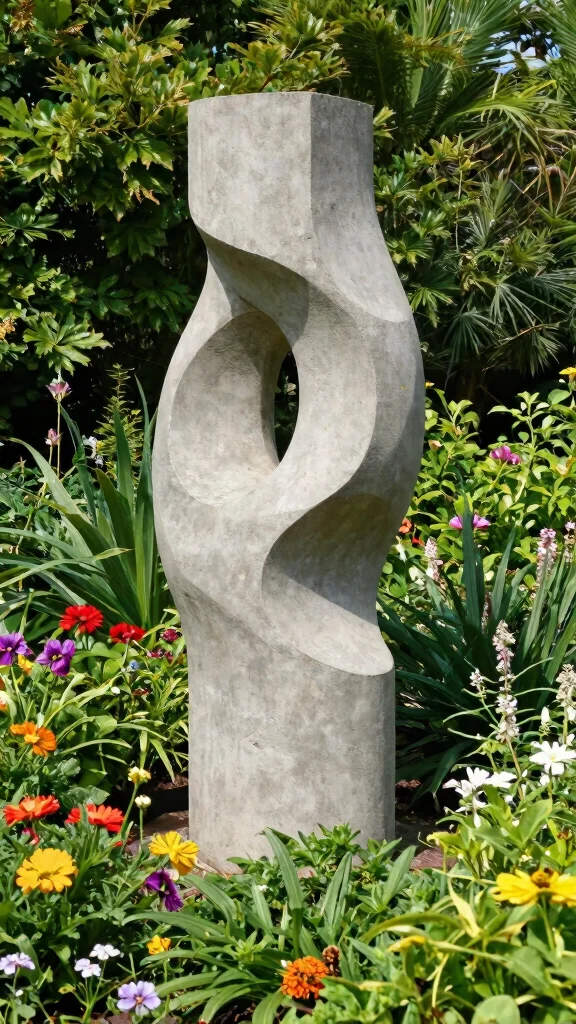
3. Stone Sculptures
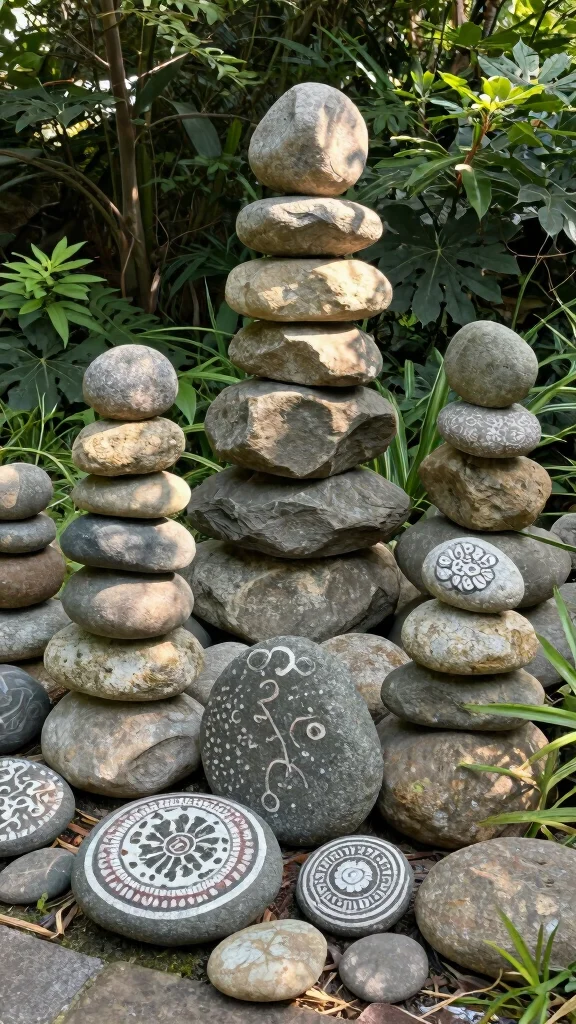
For a more grounded and tranquil aesthetic, consider crafting stone sculptures that naturally blend into your garden. Whether you opt for large boulders or smaller pebbles, stone art can provide stunning contrasts against your plants, evoking a serene atmosphere.
Start by selecting stones that match your vision, like smooth river rocks for a minimalist vibe or rugged stones for a more natural feel. Stacking stones in creative arrangements can add visual interest, and you can even paint them for colorful designs. Ensure larger pieces are secured to prevent accidental tipping, making this low-maintenance art a lasting feature in your garden.
Materials to gather:
– Various stones (river rocks, boulders)
– Paint (optional)
– Strong adhesive (for stacking)
Steps to create your stone sculptures:
1. Choose stones based on your desired style.
2. Clean the stones for better adhesion if stacking.
3. Arrange stones in a visually pleasing way.
4. Paint designs on stones if desired.
5. Secure larger stones in place.
Creating stone sculptures will enhance your garden’s beauty and provide a calm, grounding presence that you can enjoy for years.
Fun fact: a well-placed stone sculpture can boost perceived garden value by up to 60%. Stack river rocks for a minimalist vibe or rugged stones for a natural feel, and you’ve created unique garden art that calms the entire yard.
4. Garden Totem Poles
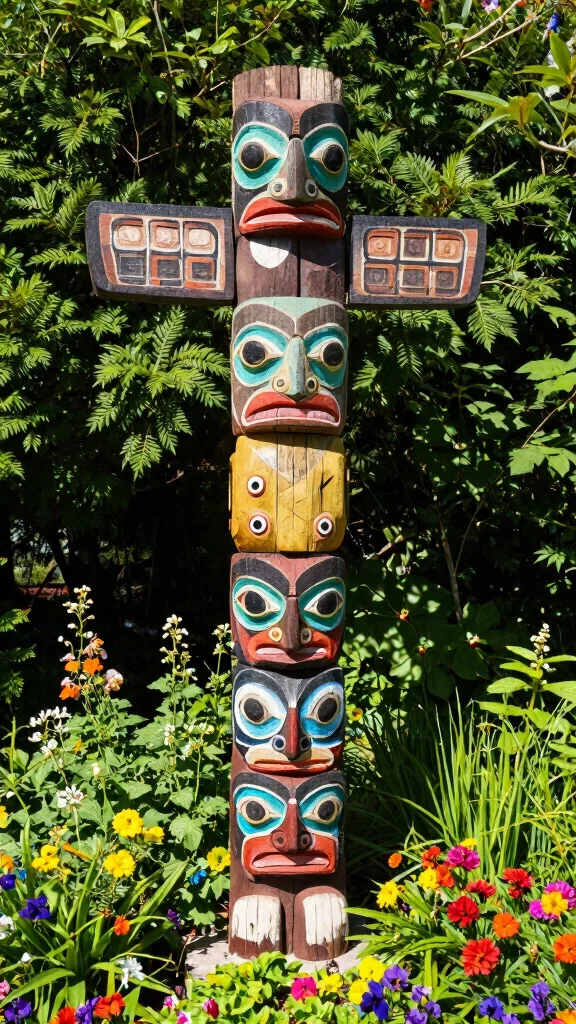
Brighten up your garden with colorful totem poles that reflect your personality and culture. These playful sculptures can be crafted from wood, concrete, or stacked stones, each uniquely painted to tell a story or convey a theme. They stand tall, acting as eye-catching focal points in your space.
Begin by selecting a sturdy base, like an old wooden post or several smaller logs stacked together. Carve or paint vibrant designs onto the surface, and use weather-resistant paint to ensure longevity. For added creativity, consider inviting friends or family to contribute their artwork, making your totem even more special.
Key materials to gather:
– Wooden posts or logs
– Weather-resistant paint
– Beads or decorative elements (optional)
Steps to create your garden totem:
1. Choose your base for the totem.
2. Prepare the surface by sanding if necessary.
3. Design and paint your totem.
4. Attach any decorative elements if desired.
5. Secure your totem in an appealing location in the garden.
This project will add a vibrant and personal touch to your garden, inviting curiosity and admiration from all who visit!
5. Vintage Fork and Spoon Garden Stakes
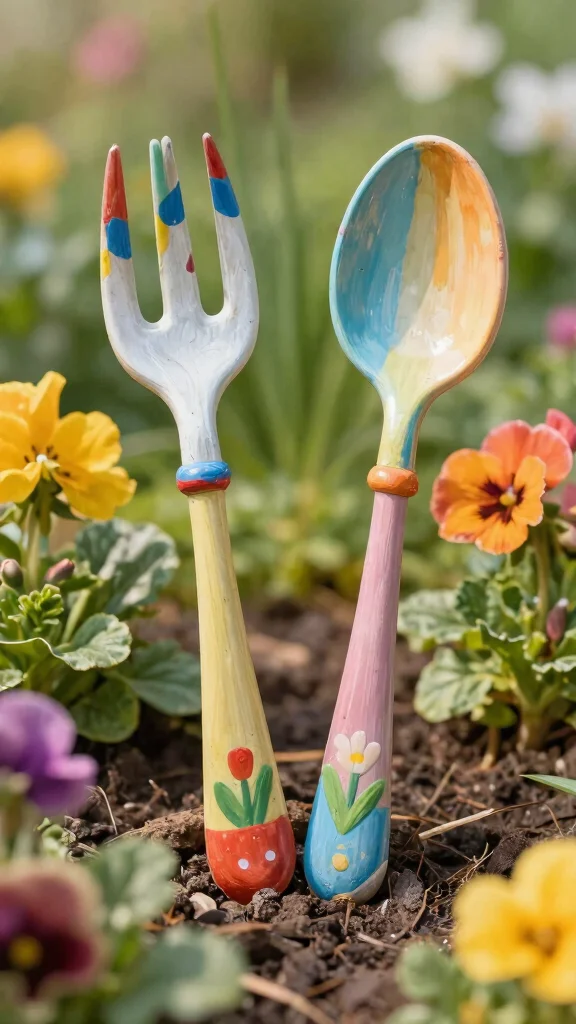
Transform your old cutlery into charming garden stakes that add a whimsical touch to your outdoor space. Vintage forks and spoons can serve as delightful markers for plants or simply as decorative accents, showcasing your creativity and resourcefulness.
To create these stakes, gather a selection of old utensils and bend the handles into fun shapes. Attach them to wooden stakes or insert them directly into the soil. You can paint the utensils for a colorful look or leave them as-is for a rustic feel. These stakes also serve a practical purpose, helping to label your herbs or flowers in style.
Materials to gather:
– Old forks and spoons
– Wooden stakes or wire
– Paint (optional)
Steps to create your garden stakes:
1. Gather old cutlery and wooden stakes.
2. Bend the handles into creative shapes.
3. Attach them to the stakes or place directly in the soil.
4. Optionally, paint the utensils for extra flair.
Using vintage cutlery in your garden will not only add charm but also spark conversations, making your outdoor area truly unique.
How To Choose Unique Garden Art
Choosing unique garden art can elevate the beauty of your outdoor space and impress your neighbors. Whether you’re looking for whimsical sculptures or elegant accents, the right pieces can transform your garden into a stunning retreat. Here are some key points to consider when selecting garden art:
1. Style
Think about the overall theme of your garden. Are you aiming for a rustic, modern, or whimsical look? Your garden art should complement your existing plants and decor. For example, a sleek metal sculpture may suit a contemporary garden, while a colorful totem pole can enhance a playful, eclectic space.
2. Size
Consider the size of the space where you’ll place the art. Large sculptures can serve as focal points, while smaller pieces can accentuate flowerbeds or paths. A good rule of thumb is to choose art that is proportionate to the surrounding elements. Measure the area first to ensure the piece fits well without overwhelming or getting lost in the scenery.
3. Material
Materials determine not only the look of your garden art but also its durability. Common materials include metal, stone, wood, and glass. Metal sculptures can resist weather and rust if treated properly, while wooden pieces may require maintenance. Pick a material that aligns with your climate and desired longevity of the artwork.
4. Color
Color can significantly influence the vibe of your garden. Bright, bold colors can create a cheerful atmosphere, while muted tones offer a more serene feel. Think about the flowers and plants in your garden. Choose colors that either contrast beautifully or match harmoniously with them.
5. Purpose
Consider what purpose you want the art to serve. Some pieces may function as focal points, while others can enhance the garden’s ambiance. For instance, a whimsical birdhouse brings character and attracts wildlife, while a decorative lantern adds warmth with soft lighting at night. Decide on the function before making a purchase.
6. Budget
Set a budget before you start shopping. Garden art can vary greatly in price, from affordable DIY options to high-end designer pieces. Determine how much you are willing to invest. If you’re on a budget, look for sales or consider creating your own unique pieces using recycled materials.
Pro Tip: Don’t rush your decision! Take your time to browse different options and visualize how each piece will fit into your garden. You might even want to sketch your layout to see where each element will go before making a commitment. The right art will not only beautify your space but also reflect your personality and creativity.
6. Wind Chimes from Recycled Materials
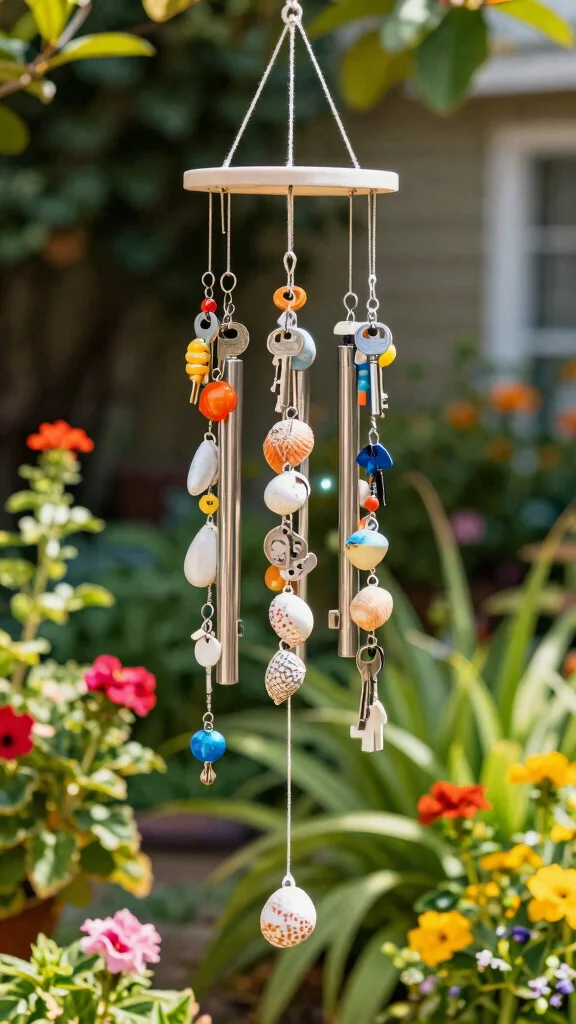
Enhance your garden’s ambiance with beautiful wind chimes made from recycled materials. These delightful chimes can produce soothing sounds that harmonize with the gentle rustle of leaves, creating a peaceful atmosphere in your outdoor space.
Start by gathering materials that can withstand the elements, like old keys, shells, or bamboo. String the keys together with fishing line, or arrange bamboo pieces creatively to form a harmonious design. Assemble your chimes by attaching everything to a sturdy base, such as an old branch or embroidery hoop, and hang them where they can catch the breeze for delightful melodies.
Essential materials to collect:
– Recycled items (keys, bamboo, shells)
– Strong string or fishing line
– Base (wooden branch or embroidery hoop)
Steps to create your wind chimes:
1. Collect materials for your wind chimes.
2. Prepare the base to ensure sturdiness.
3. String the items together at varying lengths.
4. Securely attach them to the base.
Creating wind chimes will bring a melodic touch to your garden, turning it into a peaceful retreat filled with delightful sounds.
7. Concrete Garden Sculpture
Concrete offers a versatile option for creating durable and artistic garden sculptures. From abstract shapes to animal figures, you can mold concrete into various forms, providing lasting beauty in your outdoor environment.
To get started, choose a mold—anything from a plastic container to a custom shape will work. Mix your concrete as per the package instructions, then pour it into the mold. For added texture, you can embed small stones or glass pieces. Once set, remove the mold and paint or leave it in a natural state. These sculptures can serve as striking focal points within your garden.
Materials to gather:
– Concrete mix
– Mold (plastic container or custom form)
– Decorative elements (optional)
Steps to create your concrete sculpture:
1. Prepare your mold for the sculpture.
2. Mix the concrete as instructed.
3. Pour the mixture into the mold.
4. Allow it to set as recommended.
5. Remove the mold and finish as desired.
Crafting concrete sculptures will add a modern touch to your garden, making it a unique and inviting space.
8. Terracotta Pot Critters
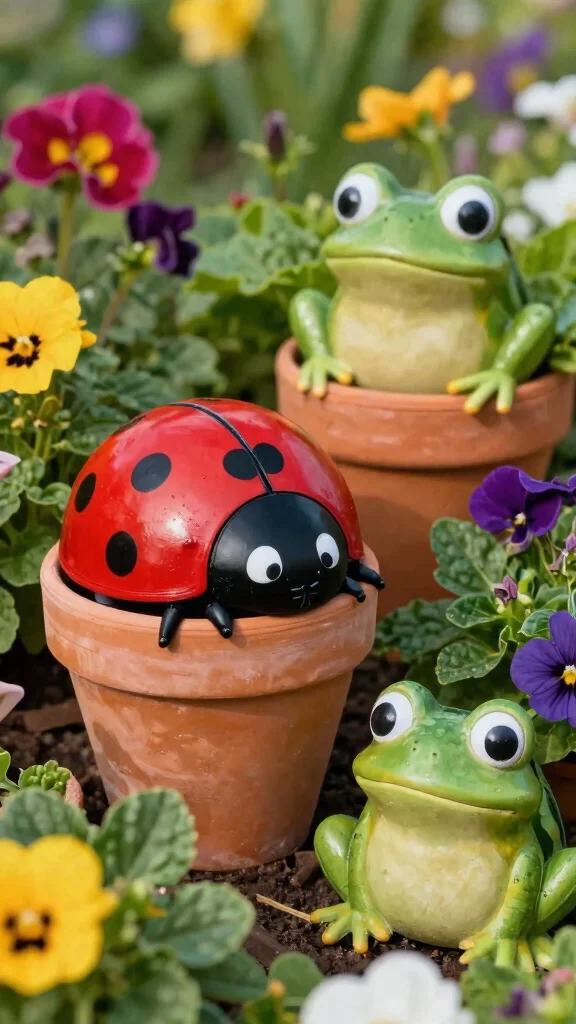
Transform simple terracotta pots into adorable critters that bring a playful vibe to your garden. These easy-to-make sculptures can charm anyone who visits, adding a touch of whimsy to your outdoor space.
Start by stacking terracotta pots of different sizes to form the body of your critter, using smaller pots for the head and legs. Paint them in bright, cheerful colors, and add fun features like googly eyes, wings, or antennae using inexpensive materials. Secure all pieces with glue to ensure they withstand outdoor conditions. Create everything from cheerful ladybugs to friendly frogs that will surely invite smiles from your guests.
Materials to gather:
– Terracotta pots (various sizes)
– Paint (outdoor-friendly)
– Decorative elements (googly eyes, fabric for wings)
Steps to create your critters:
1. Choose pots and stack them as desired.
2. Paint the pots in fun colors.
3. Add features using glue and decorative materials.
Creating terracotta pot critters will infuse your garden with fun and personality, making it a joyful retreat for all.
You might also like
9. Recycled Glass Bottle Flowers

Brighten your garden with unique flowers made from recycled glass bottles. These vibrant blooms not only enhance sustainability but also add an artistic flair that stands out in your outdoor space.
To craft glass bottle flowers, gather bottles in a variety of colors and shapes. Use a glass cutter to shape the bottles into petals and attach them to a sturdy base, like a metal rod or wooden stake. Wire can help hold the pieces together and create lovely arrangements that mimic real flowers. As the sunlight shines through, these sculptures cast colorful reflections, adding magic to your garden.
Materials to gather:
– Recycled glass bottles
– Glass cutter
– Metal rods or wooden stakes
– Wire (for assembly)
Steps to create your glass bottle flowers:
1. Collect glass bottles in different colors.
2. Carefully cut the bottles into petal shapes.
3. Assemble the petals onto a rod or stake.
4. Secure with wire as needed.
Using recycled glass bottles for flowers will create a lively and colorful display in your garden, making it more inviting and cheerful.
Fun fact: one discarded bottle can be cut into several petals, yielding 3–5 vibrant glass flowers. When wired to a sturdy stake, these unique garden art blooms bring color year-round and cut plastic waste from your yard.
10. Rustic Birdhouses
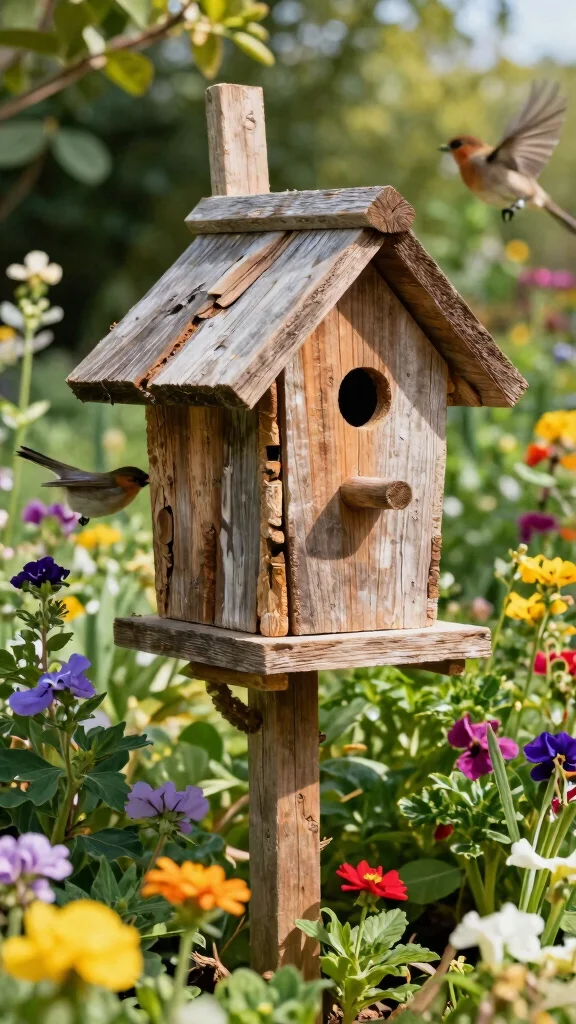
Craft charming rustic birdhouses that not only support local wildlife but also add character to your garden. By using reclaimed wood, logs, or old crates, you can create safe and snug homes for birds.
Select materials that can withstand the elements and design the birdhouse to suit its future inhabitants. Ensure a cozy entrance and incorporate details like ventilation holes. Painting the exterior in earthy tones will blend beautifully with your garden surroundings. Position your birdhouse in a quiet area, perhaps nestled among trees or shrubs, to encourage feathered visitors.
Materials to gather:
– Reclaimed wood or logs
– Nails, screws, or glue
– Outdoor paint (optional)
Steps to create your birdhouse:
1. Choose your building materials.
2. Cut wood pieces for the base, walls, and roof.
3. Assemble using nails or screws.
4. Paint the exterior if desired.
Creating rustic birdhouses will attract beautiful birds to your garden while enhancing its charm and visual appeal.
11. Mosaic Garden Art
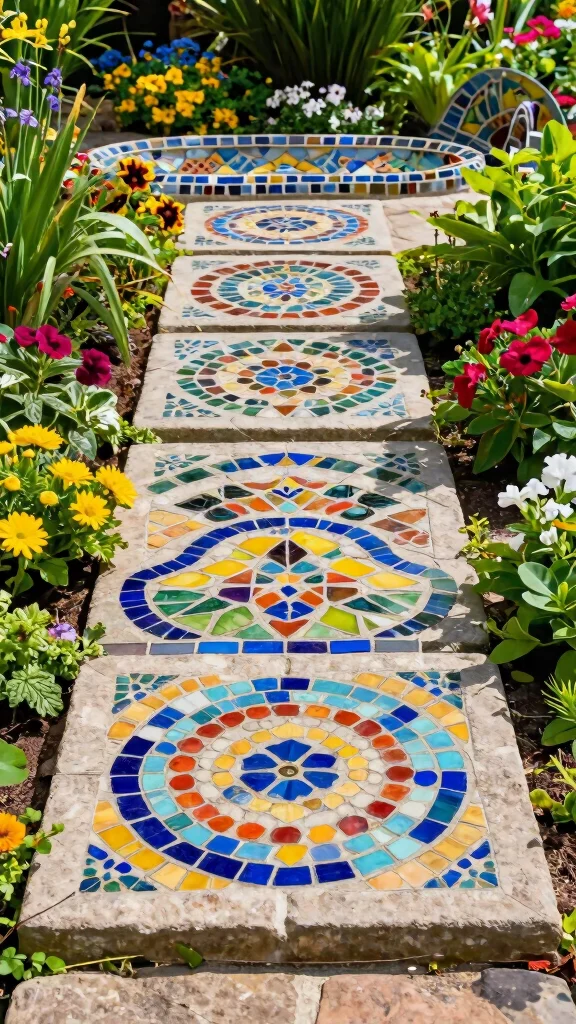
Infuse your garden with artistic flair through vibrant mosaic sculptures that can enhance pathways or serve as standalone art pieces. Using bits of glass, tiles, or stones, you can create stunning designs that capture the attention of any visitor.
Begin by gathering materials like broken tiles and glass. Start with a solid base, perhaps a stepping stone or birdbath, and arrange your materials in a pattern that inspires you. Use strong adhesive to secure everything in place, and once finished, apply grout for a polished look. Mosaics allow for endless creativity, providing a unique artistic touch to your garden decor.
Materials to gather:
– Broken tiles, glass, or stones
– Strong adhesive
– Grout
Steps to create your mosaic art:
1. Collect materials for your mosaic.
2. Select a base for your design.
3. Arrange the pieces into a pattern.
4. Secure with adhesive and allow to dry.
Creating mosaic art will bring color and texture to your garden, making it a vibrant and inviting space.
12. Creative Log Planters
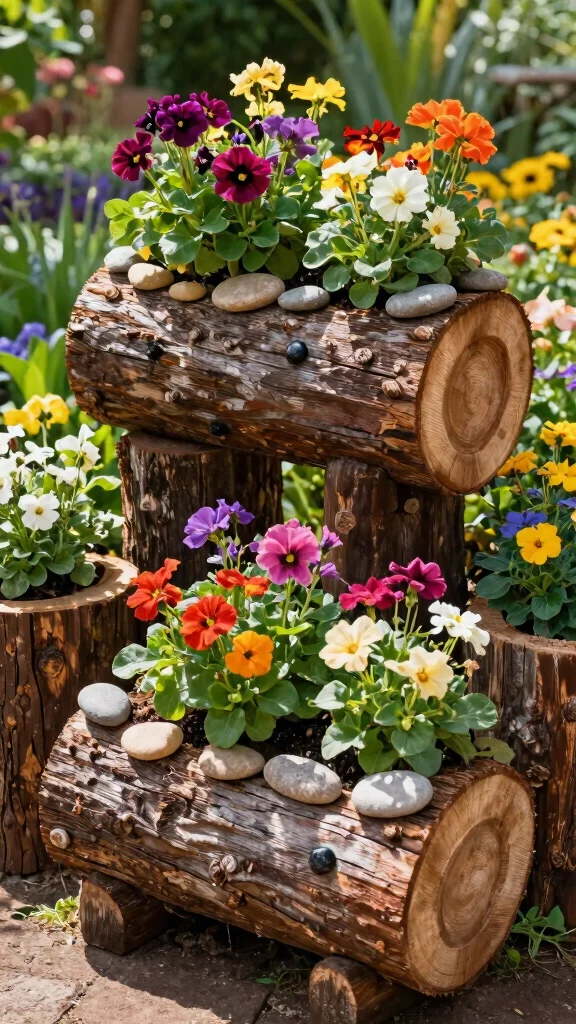
Turn old logs into charming planters that not only serve a purpose but also add rustic beauty to your garden. These log planters can become homes for your favorite flowers or herbs, enhancing your outdoor space’s character.
Select logs that are hollowed out or easy to cut, and drill drainage holes to prevent water accumulation. Fill them with potting soil and plant your chosen flora. For added flair, consider painting the logs or attaching decorative elements like stones or twigs. Position your log planters in eye-catching spots to create delightful focal points.
Materials to gather:
– Old logs
– Potting soil
– Flowers or herbs
– Paint (optional)
Steps to create your log planters:
1. Choose logs and hollow them out if necessary.
2. Drill drainage holes in the bottom.
3. Fill with potting soil.
4. Plant your desired flora.
Creating log planters will allow you to enjoy gardening while adding a unique rustic touch to your garden.
13. Playful Garden Gnomes
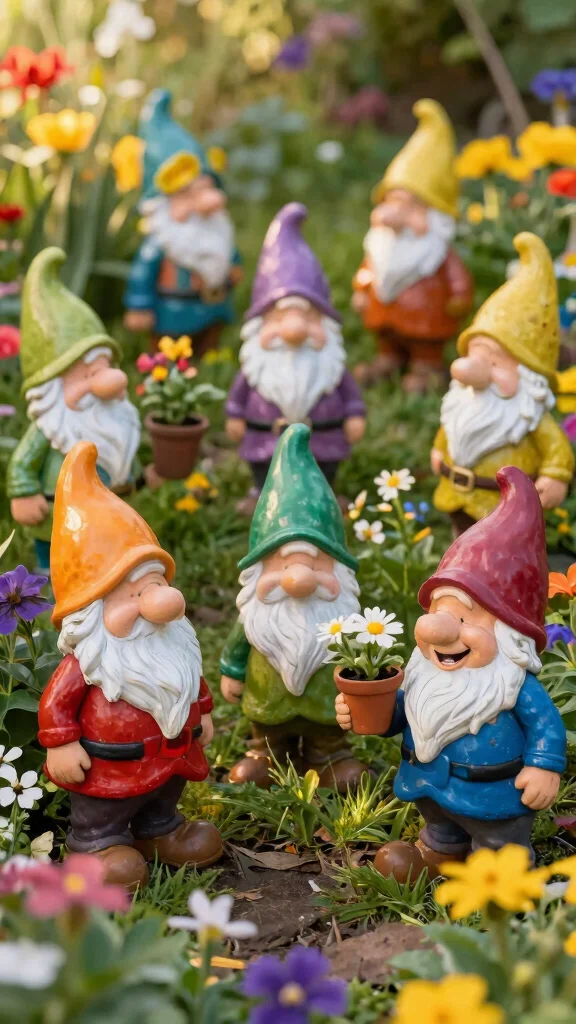
Introduce a whimsical element to your garden with playful gnomes made from clay, plaster, or painted stones. These charming figures can add personality to your outdoor space, inviting smiles and creating a cheerful atmosphere.
Mold gnomes using air-dry clay or plaster, ensuring they feature distinctive traits like pointy hats and beards. Once fully dried, paint them in bright colors and finish with a protective sealant. For a simpler approach, paint stones to resemble gnomes, using fun designs. Place them in flower beds or along paths for delightful surprises.
Materials to gather:
– Air-dry clay or plaster
– Paint
– Protective sealant
Steps to create your garden gnomes:
1. Mold your gnome from clay or plaster.
2. Allow it to dry completely.
3. Paint your gnome with vibrant colors.
4. Apply sealant for protection.
Crafting playful garden gnomes will infuse your outdoor space with fun and charm, making it a magical retreat for everyone.
14. Upcycled Tire Creations
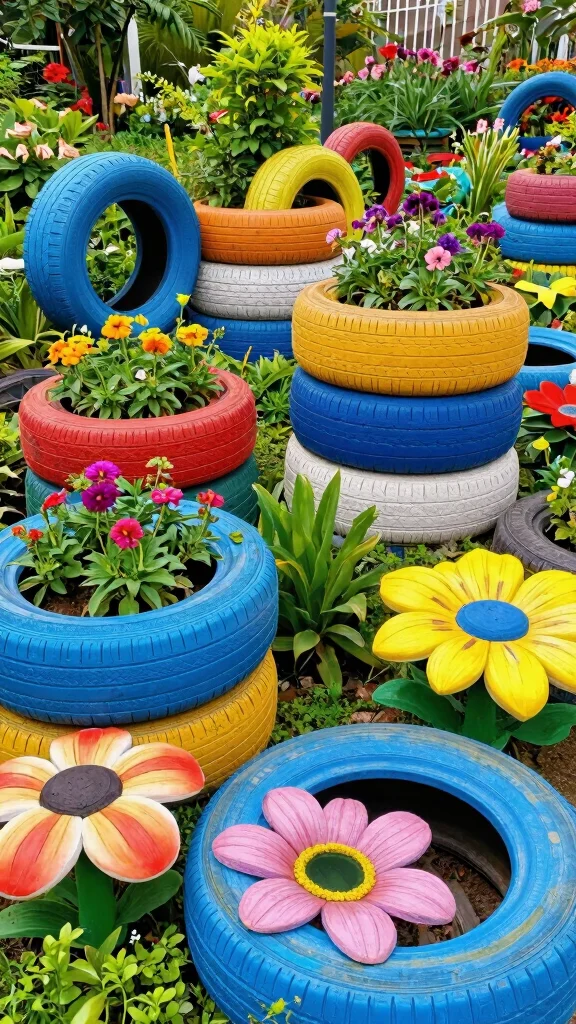
Breathe new life into old tires by transforming them into creative garden sculptures or planters that stand out and add flair to your outdoor space. With a bit of imagination, these discarded items can become whimsical displays that intrigue and amuse.
To start, clean your tires thoroughly and cut them into fun shapes. You can create birds, insects, or even abstract art forms. For planters, stack tires and fill them with soil for planting flowers or vegetables. Paint them in bright colors to make them pop. Using upcycled tires not only helps the environment but also provides unique statement pieces for your garden.
Materials to gather:
– Old tires
– Paint
– Soil and plants (if making planters)
Steps to create your tire art:
1. Clean tires and prepare for use.
2. Cut into shapes or stack for planters.
3. Paint in vibrant colors.
Upcycling tires will transform your garden into a fun and creative space that showcases your personality and style.
15. Hanging Garden Orbs
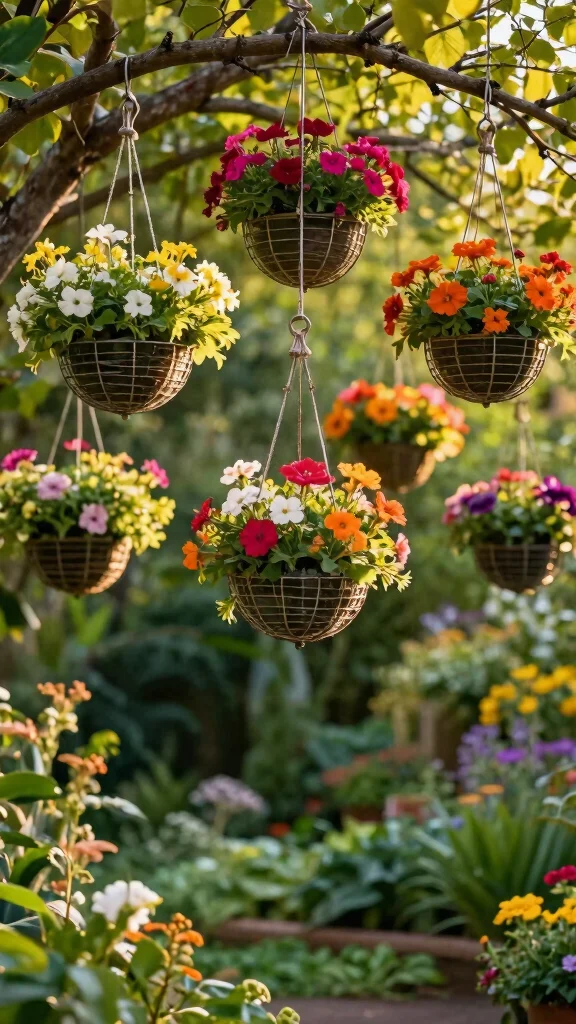
Create stunning visual displays with hanging garden orbs crafted from various materials like wire or fabric. These orbs can be filled with plants, lights, or decorative elements, adding depth and interest to your garden.
To make hanging orbs, start by forming a wire framework into a round shape, or get creative with intricate designs. If you prefer a softer look, consider using fabric to create orbs that can house small plants or fairy lights inside. Hang them from trees or hooks at varying heights for a captivating effect.
Materials to gather:
– Wire or fabric
– Plants or decorative elements
– Hooks for hanging
Steps to create your hanging orbs:
1. Create a wire framework in a round shape.
2. Cover with fabric if desired.
3. Fill with your chosen materials.
Hanging garden orbs will enhance the visual appeal of your garden, creating a magical atmosphere that delights visitors.
Fun fact: Hanging garden orbs turn ordinary spaces into unique garden art—adding a few 12-inch fabric orbs with fairy lights draws the eye. You can start by threading lights inside, then hang from a tree for instant impact!
You Might Also Like
16. Stacked Garden Stones
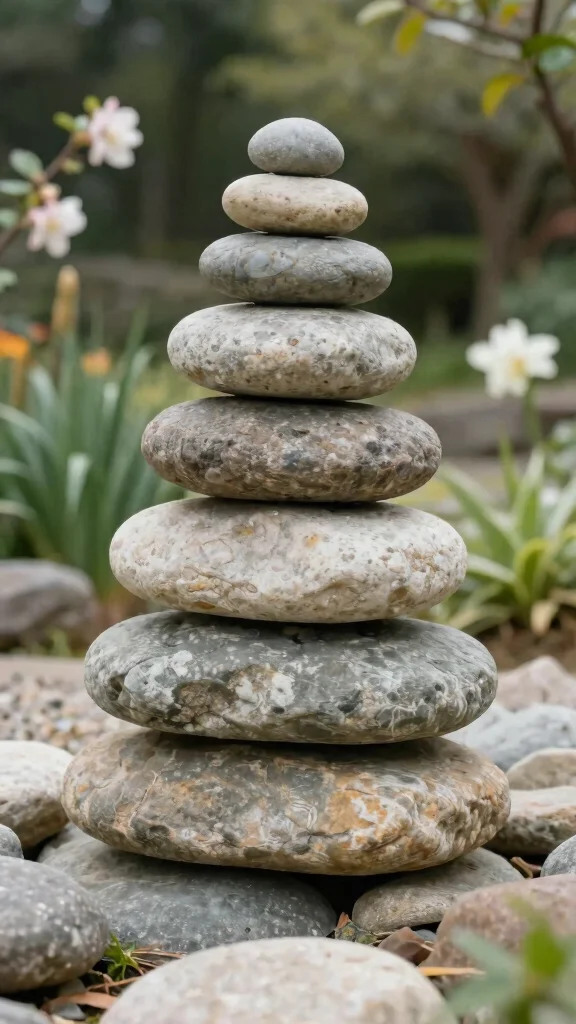
Stacked stones can form elegant and calming sculptures in your garden, symbolizing balance and tranquility. This natural art form makes a perfect addition to meditation spaces or zen gardens.
Begin by selecting stones of various sizes and shapes, ensuring a flat base for stability. Carefully stack the stones, starting with larger pieces and gradually adding smaller ones. You can leave them in their natural state or paint them in soothing colors. The beauty of stacked stones lies not only in their appearance but also in the mindful process of creating them.
Materials to gather:
– Various stones
– Paint (optional)
Steps to create your stacked stones:
1. Choose a location for your stones.
2. Select stones of different sizes.
3. Begin stacking from the largest to the smallest.
Creating stacked stone sculptures will enhance the peaceful ambiance of your garden, inviting moments of reflection and serenity.
17. Colorful Painted Rocks
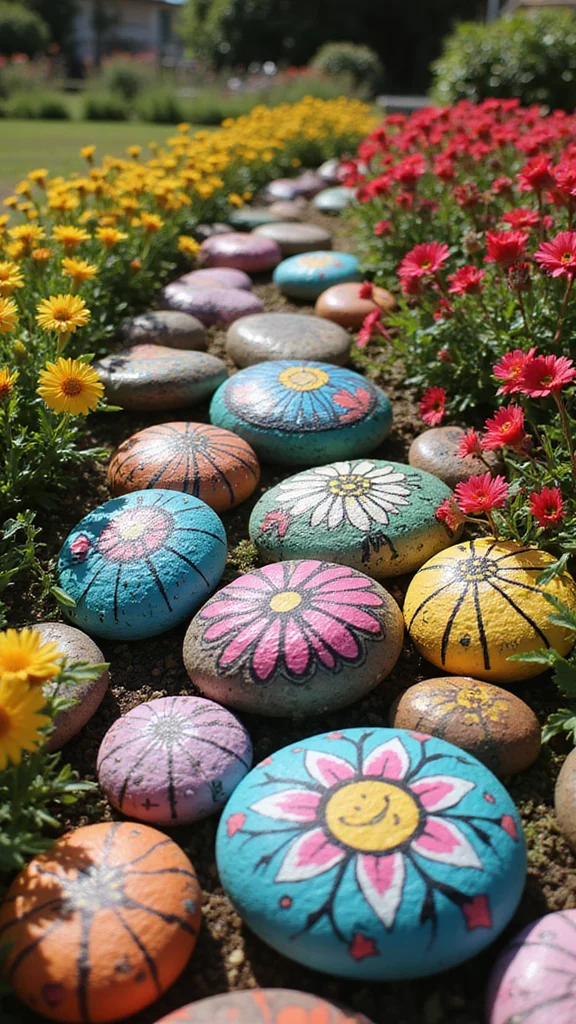
Add a playful twist to your garden with colorful painted rocks that serve as art pieces or fun garden markers. This simple project can brighten your landscape while allowing for creativity and personalization.
Gather smooth rocks of various sizes and shapes. Use outdoor-friendly paint to create vibrant designs, patterns, or even messages. Once painted, these rocks can line pathways, mark garden beds, or be simply displayed throughout your garden. You can invite family or friends to join in the fun, creating a cheerful community art project together.
Materials to gather:
– Smooth rocks
– Outdoor-friendly paint
– Paintbrushes
Steps to create your painted rocks:
1. Collect rocks of various sizes.
2. Clean the rocks to remove any dirt.
3. Paint your designs on the rocks.
Creating colorful painted rocks will add personality and joy to your garden, making it a welcoming space for all.
18. Nature-Inspired Wall Art
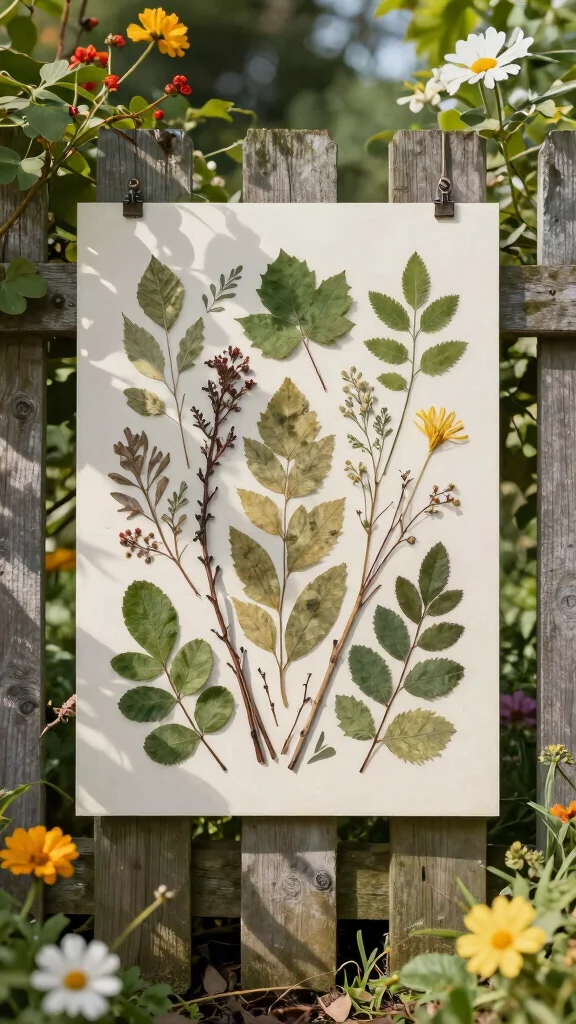
Bring your garden walls to life with nature-inspired wall art that showcases the beauty of the outdoors. These pieces can be crafted from natural materials like wood, leaves, or stones, creating a seamless blend with your garden.
Begin by selecting a sturdy base, such as an old wooden board or canvas. Gather natural elements for your design. You can create beautiful leaf prints by pressing leaves onto the surface with paint or arrange stones or twigs in artistic patterns. Once complete, hang your artwork in the garden as a focal point that draws attention and enhances the connection between indoor and outdoor spaces.
Materials to gather:
– Wooden board or canvas
– Natural materials (leaves, stones)
– Paint (optional)
Steps to create your nature-inspired art:
1. Choose your base for the artwork.
2. Gather natural elements for your design.
3. Arrange the elements creatively.
Crafting nature-inspired wall art will add a personal touch to your garden, making it a unique and inviting space that reflects your love for the outdoors.
19. Terrarium Sculptures
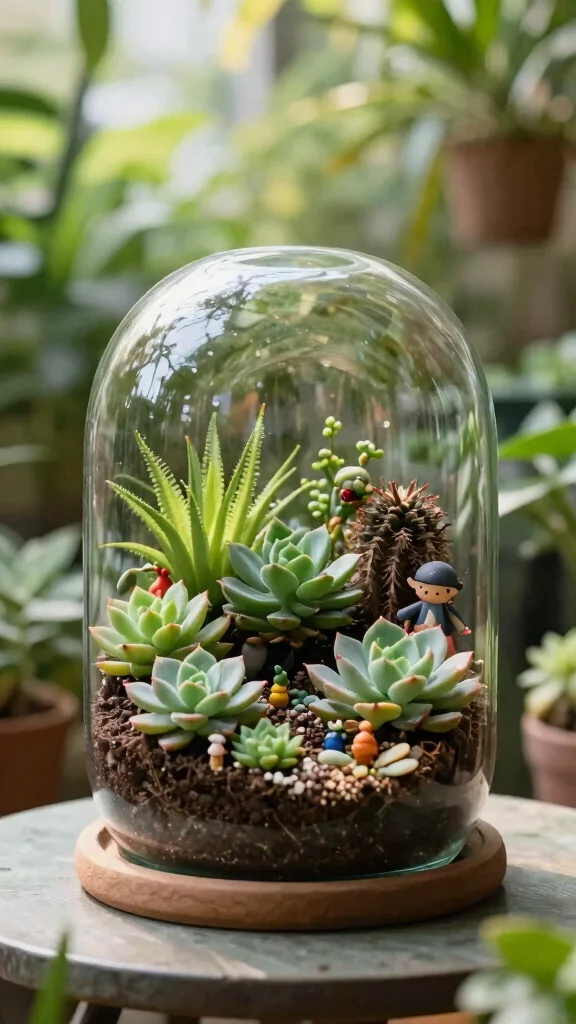
Create enchanting terrarium sculptures that serve as miniature gardens within your larger garden. These glass containers can house plants and decorative elements, adding a unique touch to your outdoor decor.
To make a terrarium, choose a glass container with an opening. Layer pebbles at the bottom for drainage, followed by activated charcoal to keep the environment fresh. Add potting soil and plant your chosen flora, such as succulents or ferns. Fill the space with miniature figurines or decorative stones to enhance the visual appeal. Terrariums require minimal maintenance and can be personalized for any style.
Materials to gather:
– Glass container
– Pebbles
– Activated charcoal
– Potting soil
– Plants (succulents, ferns)
– Decorative elements (figurines, stones)
Steps to create your terrarium:
1. Gather your materials for the terrarium.
2. Layer pebbles for drainage at the bottom.
3. Add activated charcoal for freshness.
Creating terrarium sculptures will add a magical touch to your garden, providing a delightful focal point that’s easy to maintain.
20. Garden Lanterns from Recycled Jars
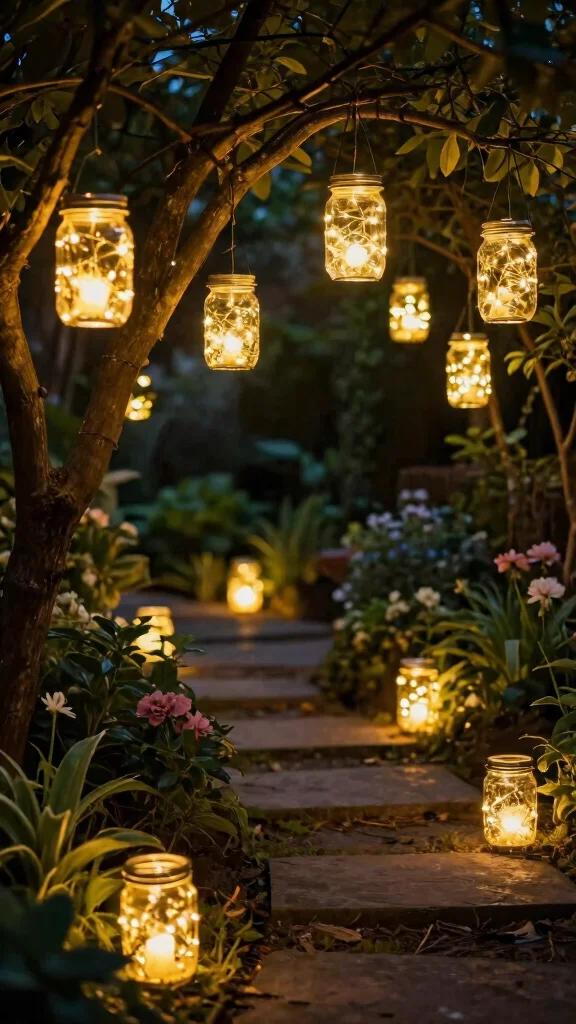
Transform ordinary jars into enchanting garden lanterns that illuminate your outdoor space with warmth and charm. This project not only beautifies your garden but also utilizes materials you likely already have at home.
Start by collecting glass jars that can be painted or left plain. Add battery-operated fairy lights or tea candles inside for a magical glow. Decorate the outside with twine, lace, or paint for a personalized touch. Hang the jars from tree branches or place them along pathways to create a dreamy atmosphere. These lanterns are perfect for evening gatherings, adding an inviting ambiance to your garden.
Materials to gather:
– Glass jars
– Fairy lights or tea candles
– Twine or decorative materials (optional)
Steps to create your garden lanterns:
1. Collect glass jars and clean them thoroughly.
2. Paint or decorate the outside if desired.
3. Add lights or candles inside the jars.
Making garden lanterns will bring a magical glow to your outdoor space, creating a warm and welcoming environment for all!
Conclusion
Creating decorative DIY garden sculptures not only enhances your outdoor space but also allows for self-expression and creativity. With so many unique options at your fingertips, you can easily transform your garden into a personal paradise. From whimsical fairy houses to elegant stone sculptures, there’s an art piece for every gardener’s taste.
Consider incorporating a few of these ideas to make your garden truly stand out and impress your neighbors. These projects can be enjoyed alone or with loved ones, creating memorable experiences while beautifying your surroundings.
Frequently Asked Questions
What are beginner-friendly DIY garden sculptures to create unique garden art that transform your yard?
Here are a few beginner-friendly ideas to kick off your unique garden art collection and transform your yard.
– Painted rocks or stones totems: gather smooth stones, prime, paint with outdoor acrylics, and seal with UV-resistant varnish for lasting color.
– Upcycled metal or reclaimed-wood silhouettes: cut shapes from scrap metal or reclaimed wood, seal against weather, and mount on stakes for height in borders.
– Simple concrete accents: cast shallow bowls or planters, embed decorative stones, let curing, then paint or seal for durability.
Tips to transform your space: pick a cohesive color palette, choose a clear focal point, and place sculptures along pathways or near seating areas to maximize unique garden art impact.
How can I choose and place garden sculptures to transform a plain yard into a stunning garden makeover?
To transform a plain yard into a stunning garden makeover, start with a plan: pick a focal sculpture, confirm the scale relative to your space, and choose a color and texture that ties the beds together.
Place sculptures along sightlines from seating areas, near entry paths, or at the end of a lawn for surprises.
Group smaller pieces in odd numbers (3 or 5) and mix tall pieces with low planters to balance vertical and horizontal lines. Ensure pieces are weather-ready and securely anchored to prevent tipping in wind.
What materials and tools do I need to start making unique garden sculptures?
Great question. Getting started with unique garden sculptures doesn’t have to be expensive. Core supplies include weather-resistant paints, outdoor sealant, and sturdy supports. Start with one of these approachable routes: 1) painted stones or ceramic pieces; 2) cement or concrete shapes; 3) upcycled items like old pots or teapots. Tools you’ll likely need: gloves, pliers, wire cutters, a paintbrush set or spray paints, sandpaper, a hammer, and a silicone or outdoor adhesive. Pro tips: sketch a quick plan first, test paints on a hidden area, and seal everything to weatherproof your unique garden art.
How do I protect and maintain decorative garden sculptures so they last through different seasons?
To protect and maintain garden sculptures, choose weatherproof materials and finishes, re-seal every 1-2 years, and clean gently with mild soap and water. It’s smart to store metal pieces indoors during harsh winters or apply rust inhibitors and UV blocks to wooden pieces. Inspect for cracks or loose connections after storms and re-anchor heavy sculptures to keep them stable. With proper care, your garden art will keep its color and shape season after season.
Where should I place DIY garden sculptures in a garden makeover to maximize wow without clutter?
Place your DIY sculptures where they become focal points without crowding your space. Think entryways, the end of a path, or a seating area where neighbors can admire your work. Use height variety: pair tall pieces with low planters to create balance, and align sculptures with sightlines from doors or windows to maximize wow factor. Consider lighting to extend their impact at dusk and protect them from mower blades by keeping clearance around the sculpture.
Related Topics
unique garden art
DIY garden sculptures
garden makeover
outdoor decor
creative gardening
easy projects
budget friendly
transform your garden
neighbor envy
seasonal garden
beginner friendly
whimsical design