Creating the perfect DIY garden pathways is more than just a weekend project; it’s about enhancing your front yard garden design and creating a space that invites relaxation and exploration. This post is here because I know many of you are looking for ways to boost your outdoor living spaces. You might be feeling overwhelmed by the options or unsure where to start. Fear not! I’ve crafted a step-by-step guide that will help you discover how to build beautiful pathways that suit your style and needs.
If you love gardening or simply enjoy spending time outdoors, this guide is for you. Whether you’re a seasoned gardener or a complete novice, you’ll appreciate the detailed instructions and tips I’ve compiled. Each section is designed to give you the knowledge and confidence to create pathways that not only look great but also make your garden more functional. By the end, you’ll have a clear understanding of materials, design choices, and finishing touches, making your gardening experience more enjoyable.
So, what can you expect from this guide? You’ll gain practical insights into everything from planning your pathway to adding the perfect lighting. I’ll break down the process into manageable steps, ensuring you feel empowered every step of the way. With the right tools and a bit of creativity, your garden pathway will become a beautiful highlight of your front yard design that you can take pride in.
Key Takeaways
– Planning Your Pathway: Start by thinking about the design and layout that complements your garden’s overall look. Take measurements and sketch out a plan to visualize your path.
– Choosing Materials: Select materials that are durable and match your garden’s style. Options like gravel, pavers, and wood can add unique character to your pathway.
– Laying the Foundation: Prepare the ground by clearing the area and leveling the surface. This step is essential for a stable and long-lasting pathway.
– Installing the Pathway: Follow your plan carefully to lay down your chosen materials. Pay attention to spacing and alignment for a professional finish.
– Adding Lighting and Landscaping: Enhance your pathway by incorporating lighting for safety and beauty. Consider surrounding greenery or flowers to create a welcoming atmosphere.
Contents
- 1. Planning Your Pathway
- 2. Choosing Materials
- 3. Laying the Foundation
- 4. Installing the Pathway
- 5. Edging Your Pathway
- 6. Filling Gaps and Finishing Touches
- 7. Adding Lighting
- 8. Landscaping Around the Pathway
- 9. Maintenance Tips
- 10. Enjoying Your Pathway
1. Planning Your Pathway
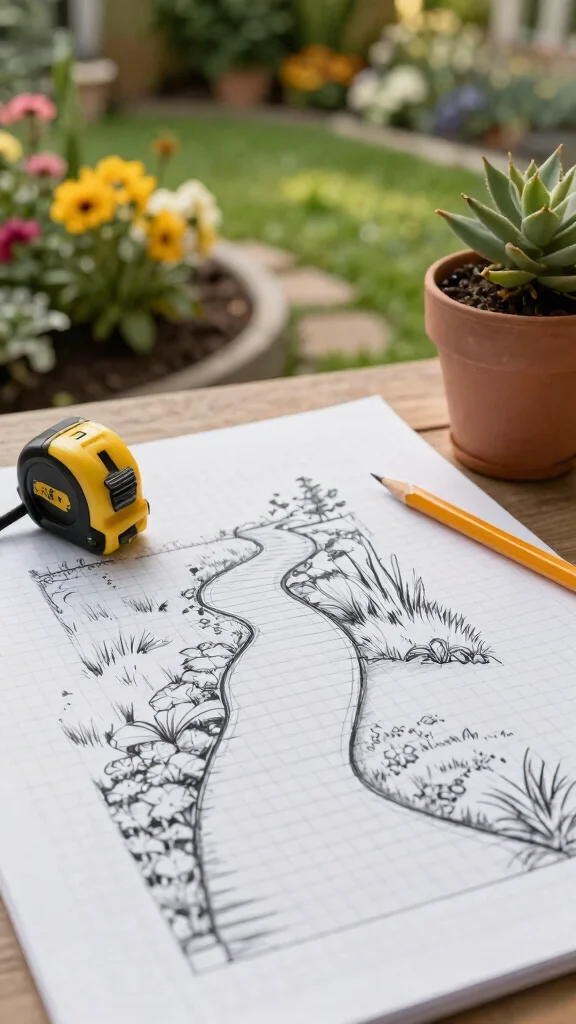
Before you dive into laying stones or bricks, it’s crucial to map out your pathway. Think about how you want to use this space. Will it connect different areas of your garden, or serve as a stunning focal point?
Begin by sketching a simple design of your garden layout. Use a tape measure to get the length and width of your desired path. Keep in mind any existing plants or trees you want to preserve. Visualize how the pathway will flow with the overall garden design. Experiment with different shapes; curved paths can feel more inviting, while straight paths lend a formal touch.
– Tip: Use a garden hose to outline the path on your lawn to visualize it better!
– Unique Insight: Adding curves can create the illusion of a larger garden space.
– Final Note: Aim for a path width that accommodates foot traffic comfortably, ideally between 2-3 feet.
2. Choosing Materials
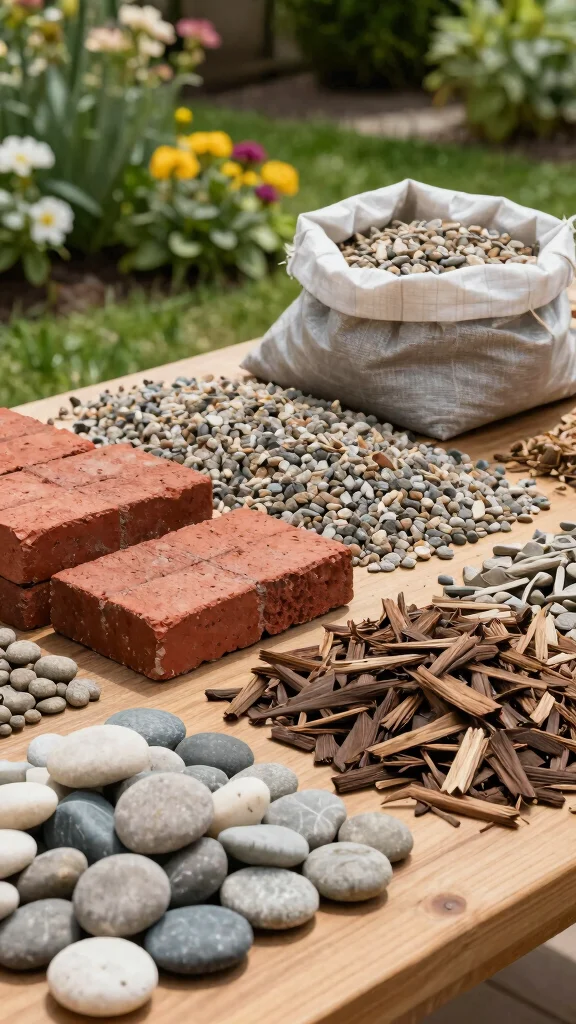
With a solid plan in hand, it’s time to select the perfect materials for your pathway. You have a plethora of options, from natural stone and brick to wood and gravel. Each material adds its own charm and vibe to your garden.
– Natural Stone: Offers rustic beauty and blends seamlessly with nature. Though pricier, its durability is worth it.
– Brick: Timeless and sophisticated, brick pathways suit a range of garden styles and can be installed in various patterns.
– Gravel: A budget-friendly and straightforward option, gravel paths are excellent for drainage and can be topped with larger stones for flair.
– Wood Mulch: Provides a cozy, informal look but needs regular upkeep.
– Tip: Think about your climate and maintenance needs when selecting materials.
– Unique Insight: Mixing materials can create an eye-catching contrast but ensure they harmonize well together.
– Final Note: Don’t forget to budget for edging materials and any necessary installation tools.
3. Laying the Foundation
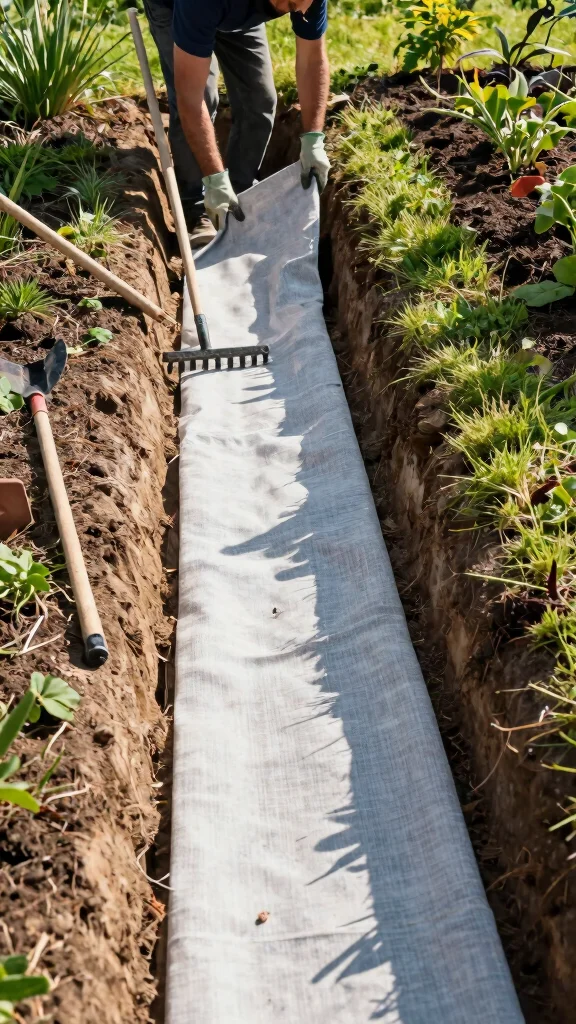
Once you’ve picked your materials, it’s vital to create a solid foundation for your pathway. This step is essential for durability and weed prevention.
Start by clearing the area of grass, weeds, and debris. Dig down about 4-6 inches to form a trench.
– Tip: Use a level to check that the base is even while digging!
– Next, lay landscaping fabric to suppress weeds and allow for proper drainage. Cut the fabric to fit the trench and secure it with stakes.
– Fill the trench with a base material like sand or crushed stone, leveling it with a rake. Compact the base for stability.
– Unique Insight: Adding a gravel layer can enhance drainage and provide a stronger foundation for heavier materials.
– Final Note: Take your time with this step to ensure your pathway lasts for years.
4. Installing the Pathway

Now the exciting part begins! Installing your pathway means placing your chosen materials into the prepared base, allowing your design to shine.
For stone paths, start at one end and work your way down, snugly fitting the stones together while checking for level. Use a rubber mallet to secure them.
– Tip: Leave small gaps between larger stones for a relaxed look, or place them tightly for formality.
– For brick paths, lay the bricks according to your desired pattern, ensuring they are even. A bit of mortar can help with stability.
– For gravel paths, spread an even layer and rake it smooth, filling in low spots as needed.
– Unique Insight: A slight curve can draw the eye and make your garden feel more expansive.
– Final Note: Step back often to admire your work as you lay each piece; it helps you see the overall effect.
5. Edging Your Pathway
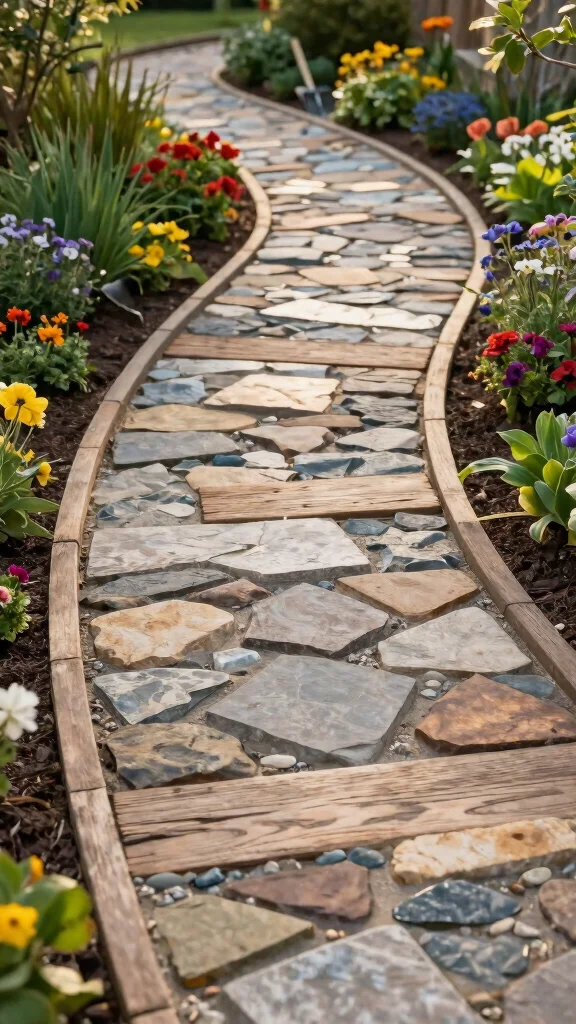
Edging not only creates a polished appearance but also keeps materials contained and deters weeds. You can choose from various materials like bricks, stones, timber, or metal.
– Bricks or Stones: Lay these on their sides for a stunning border, using mortar for enhanced durability.
– Wood Edging: Timber adds a natural feel, especially in a garden setting. Use treated wood for lasting results.
– Metal Edging: This modern option offers sharp lines and is highly durable.
– Tip: Ensure the edging is slightly taller than your pathway material to keep everything in place.
– Unique Insight: Curved borders enhance the organic feel, while straight edges provide a tidy look.
– Final Note: Pack soil or gravel tightly around the edge to maintain structure and appearance.
6. Filling Gaps and Finishing Touches
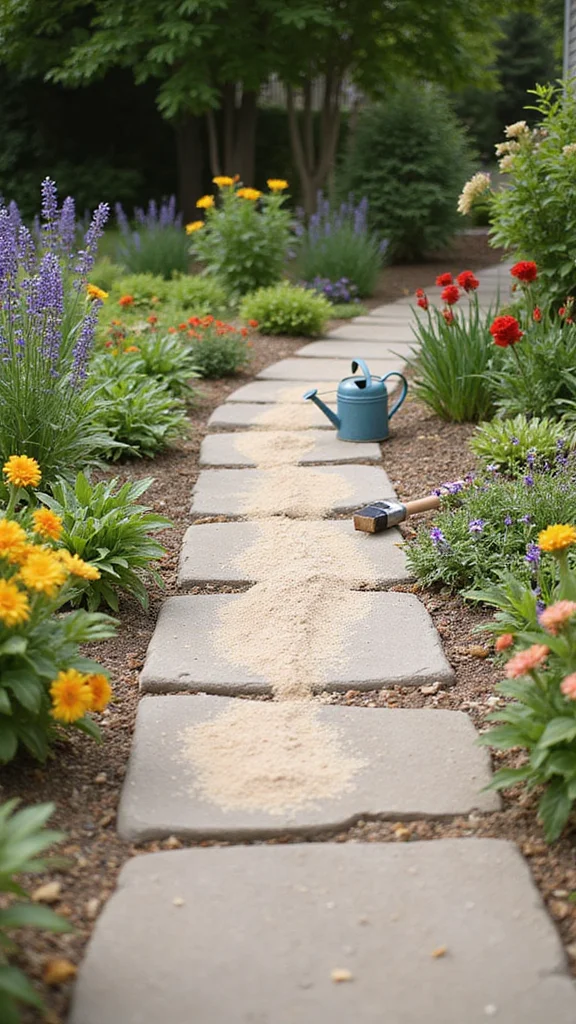
After laying your pathway and adding edging, it’s time for the finishing touches! Filling gaps between stones or bricks can improve both aesthetics and durability.
Use sand or fine gravel to fill these gaps, helping to lock the stones in position.
– Tip: Sweep filler material into the gaps with a broom to ensure it settles correctly.
– For gravel paths, consider adding larger stones along the edges to keep everything contained.
– Unique Insight: Incorporating small pebbles or decorative stones in the gaps can add unique flair to your path.
– Final Note: Lightly water the gravel after filling to help it settle and secure everything in place.
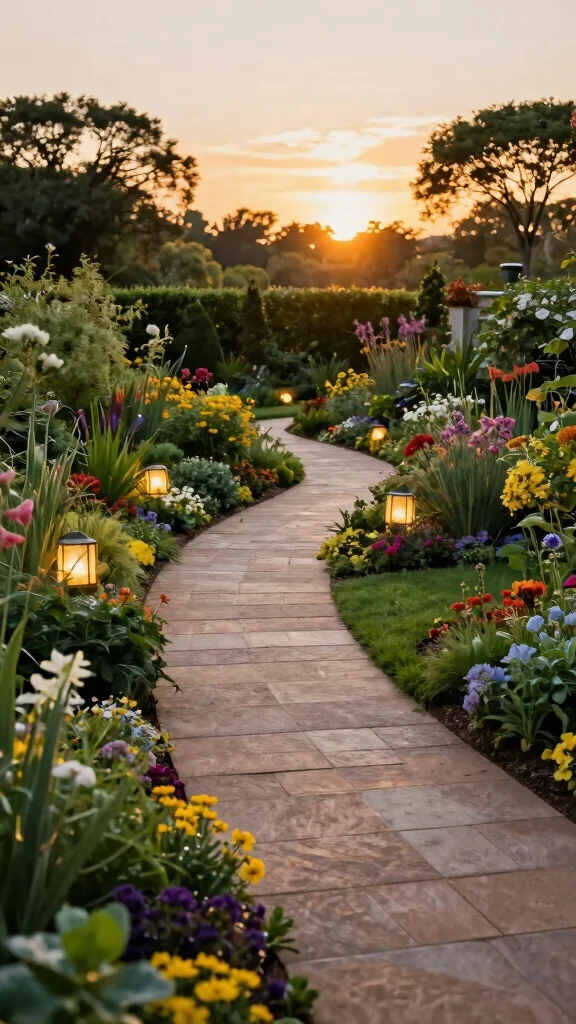
7. Adding Lighting

Enhancing your pathway with lighting can create an enchanting atmosphere while ensuring safety. You have several options that can complement your garden’s style.
– Solar Lights: Eco-friendly and easy to set up, these lights provide a magical glow at night.
– LED Strip Lights: Tuck these under edging or along the sides for a contemporary look.
– Hanging Lanterns: If your path leads to seating, hanging lanterns from trees add a whimsical touch.
– Tip: Opt for warm white lights for coziness or colorful ones for a festive feel.
– Unique Insight: Low-voltage lighting can create dramatic shadows and highlights along your pathway.
– Final Note: Plan your lighting layout before installation to ensure it fits seamlessly with your pathway design.
8. Landscaping Around the Pathway
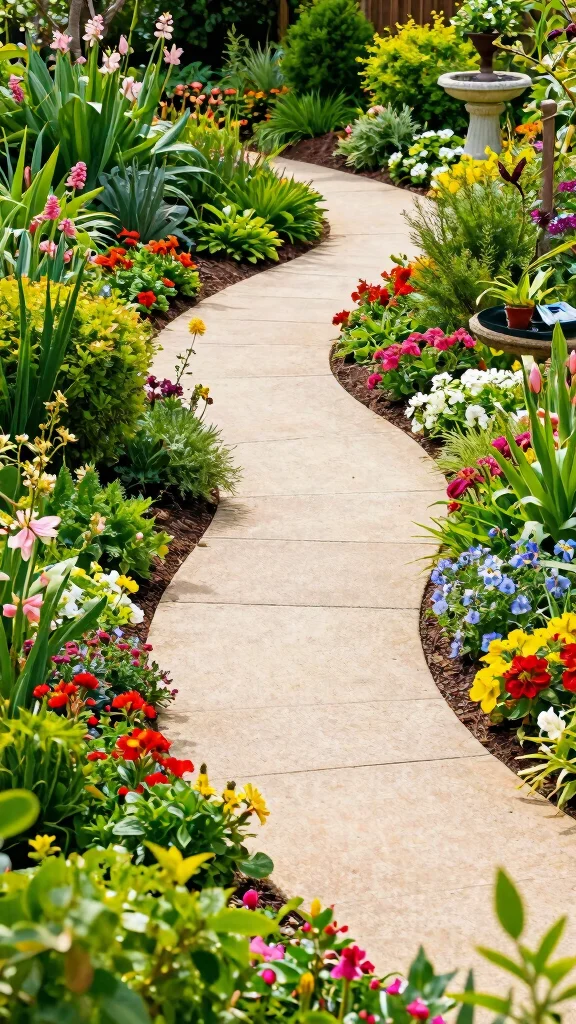
Don’t forget to give the area around your pathway some love! Thoughtful landscaping can elevate your path’s beauty and help it blend seamlessly into the garden.
– Plant Flowers: Select perennial flowers that bloom at different times, like lavender or daylilies, to keep color throughout the seasons.
– Add Foliage: Varying sizes of shrubs or ornamental grasses add depth and texture.
– Decorative Elements: Incorporate garden statues, birdbaths, or decorative rocks for added personality.
– Tip: Layer plants of different heights for a more dynamic appearance.
– Unique Insight: A planting bed along the path’s edges can frame it beautifully while softening hard materials.
– Final Note: Use mulch or decorative stones around plants to maintain a tidy look and minimize weeds.
9. Maintenance Tips
After all your hard work, let’s ensure your pathway stays stunning! Regular maintenance is key for longevity and appearance.
– Weeding: Frequently check for unwanted weeds sprouting between stones or bricks and remove them quickly.
– Cleaning: Depending on the material, power wash or scrub your pathway occasionally to keep it fresh.
– Repairing: Monitor any loose stones or edging; replacing or resealing them can prevent bigger issues.
– Tip: Installing a weed barrier under your stones can significantly reduce future maintenance.
– Unique Insight: Seasonal maintenance can turn into a fun project—consider refreshing the look with seasonal decor!
– Final Note: A seasonal checklist can keep you organized and on top of your pathway’s upkeep.
10. Enjoying Your Pathway
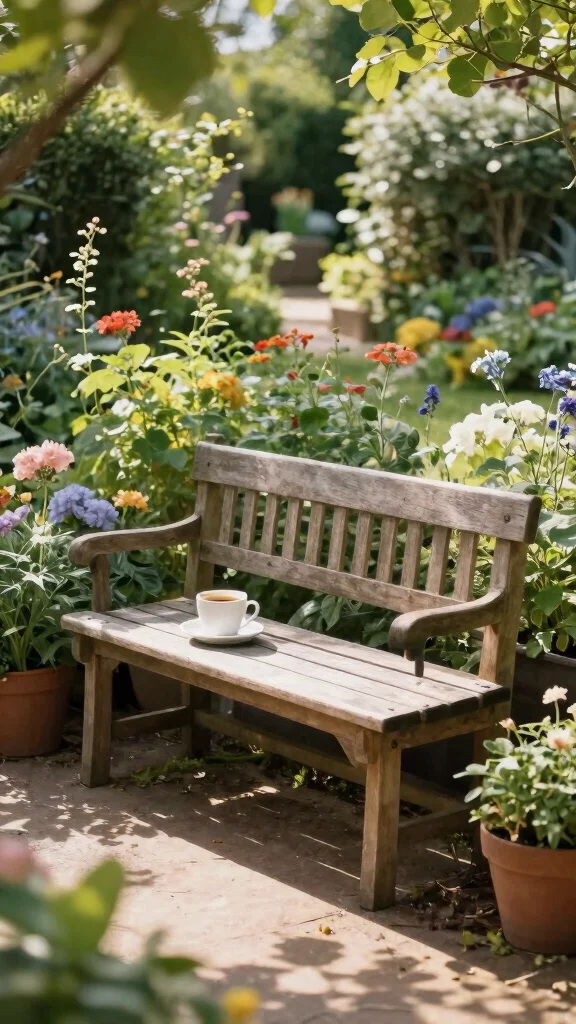
With everything laid out and maintained, it’s time to relax and enjoy your beautiful garden pathway! This space is more than just a route; it’s a place to appreciate the surrounding beauty.
Think about adding a small bench or seating nearby to sit and admire your handiwork.
– Tip: Host small gatherings around the pathway for evening strolls or morning coffees.
– Unique Insight: Place fragrant plants near your pathway to enhance your sensory experience as you enjoy your garden.
– Final Note: Capture photos of your garden path throughout the seasons to celebrate your hard work and the beauty of your outdoor space.
Conclusion
Creating the perfect DIY garden pathway is a journey filled with creativity and joy! From planning to enjoying the finished product, each step empowers you to craft a beautiful outdoor space. Embrace these tips and techniques, and don’t hesitate to let your personality shine through in your design.
Remember, every garden path tells a story—yours is just beginning! Let your garden reflect your unique style and create an inviting haven that you and your guests will love.
Frequently Asked Questions
What is the first step in the step-by-step guide to creating a front yard garden design pathway?
Start with a clear plan: assess site conditions, map the path, measure the area, and sketch a simple layout. This critical first step ensures your path fits your front yard garden design and reads well with your house. Create a scale drawing, note drainage and sun exposure, and choose a style. Decide on materials now so you can follow the rest of the step-by-step guide with confidence.
Which materials are best for a durable DIY garden pathway in a front yard?
Durable options include pavers, flagstone, stepping stones, or compacted gravel. Each has its own feel and maintenance level. Prepare a solid base: excavate 4–6 inches, lay a weed barrier, add a compacted sub-base, and finish with a 1-inch leveling layer of sand before laying the surface units. Finish with even spacing and a clean edge to keep your front yard garden design cohesive.
How wide should a garden pathway be in a front yard design for comfortable use?
Aim for about 2 feet (60 cm) for narrow pathways, 3 feet (90 cm) for comfortable one-person or two people walking side by side, and 4 feet (120 cm) if you want room for a wheelbarrow or furniture. Adjust curves and sightlines to maintain a natural flow that fits your front yard garden design and home style.
What maintenance tips keep a DIY garden pathway looking great in a front yard design?
Stay on top of it with simple routines: sweep debris regularly, pull weeds from joints, re-sand or re-grout joints every year or two, seal concrete pavers if used, and check edging after freezes or heavy rain. For gravel paths, add more gravel as it settles and rake to keep a smooth surface. These steps protect your front yard garden design and preserve your step-by-step project over time.
Can beginners complete a front yard garden pathway using a true step-by-step guide, and what tools should I gather?
Absolutely. A beginner can tackle a step-by-step guide to a front yard garden pathway. Gather essentials: tape measure, chalk line, carpenter’s level, shovel, rake, rubber mallet, wheelbarrow, garden gloves, and safety glasses; plus the base materials (weed barrier, gravel, sand) and the surface units (pavers, stepping stones, or flagstone). Then follow the plan, pace yourself, and adjust as needed for your space and climate.